Preparing for Outdoor IP67 LED Neon Flex Installation
Assessing the Installation Environment
It's important to look at the outdoor area where the IP67 LED neon flex will be put before starting the fitting process. Think about things like how much direct sunshine the plant gets, how often it rains, and how the temperature changes. These external factors can have a big effect on how well and how long your LED neon flex works.
Also, check the fixing area to make sure it's ready to be installed. The best surfaces are clean, dry, and free of any dirt or other things that could make bonding harder. If the surface isn't smooth or even, you might need to use a primer or lubricant to make it even and smooth before installing.
Gathering Necessary Tools and Materials
To make sure the work goes smoothly, get all the tools and materials you'll need ahead of time. Important things to have measuring tape and a pencil or marker for marking where to put things.
- A pair of sharp scissors or a tool knife to cut the LED neon flex
- Silicone coating to keep links dry in bad weather
- Clips or holes for mounting that are right for the surface you'll be using
- The power source and processor, if needed
- Tools to strip wires and connect electrical wires
- Gear for safety, like safety glasses and gloves
Having these tools on hand will make the installation process go more quickly and avoid problems or delays that aren't necessary.
Planning the Layout and Power Distribution
To get the look and functionality you want from your IP67 LED neon flex installation, you need to carefully plan it out. After making a rough sketch of where the neon flex will go, make sure to include any curves or corners in the design.
Moving on to power distribution. Find out how long of LED neon flex you'll be using and use the manufacturer's instructions to figure out how much power it will need. Make sure that your power source can handle the whole system without any voltage drop issues, which could cause problems with performance or uneven light.
If your placement covers a large area, you may need to plan for more than one power input point to make sure the brightness stays the same along the neon flex. This is especially important for long runs or patterns that are hard to understand with lots of turns and curves.
Installation Techniques for Outdoor IP67 LED Neon Flex
Proper Mounting Methods
Choosing the right fixing method is very important for making sure that your IP67 LED neon flex installation lasts and works well. There are several choices, and each one works best on a different surface or in a different environment:
1. Mounting clips: These are great for putting things in place on flat surfaces. The clips are properly spaced along the bright flex, usually every 12 to 18 inches, to make sure it stays in place.
2. Aluminum Channels: Aluminum channels can give your project a more finished look and extra safety. For example, these can be very helpful in places with a lot of foot traffic or where the bright flex might get hit.
3. Silicone glue: A good silicone glue can sometimes be used to stick the glowing flex straight to the fixing surface. This method works well for short-term installs or on areas that can't be drilled into.
No matter what fixing method you choose, make sure the neon flex is not stretched or squeezed during fitting. Doing so can harm the internal parts and lower the performance.

Weatherproofing Connections and End Caps
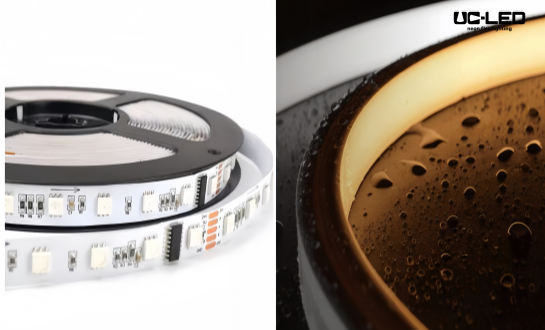
IP67 LED neon flex is made to work outside, but it's important to make sure that all of the links and end caps are properly weatherproofed to keep the system strong. Here are some important steps:
1. Use waterproof connectors: When putting neon flex pieces together or linking to power sources, use connectors that are made to be used outside.
2. Use silicone sealant: Once the connections are made, seal the joint with a good silicone lubricant to keep water out. Adding this extra layer of protection helps keep wetness out.
3. Make sure the end caps are securely attached. To keep water out of the neon flex at the ends, make sure the end caps are tightly attached and sealed with silicone.
4. Make drip loops: When running power cords to the neon flex, let one of the cables hang below the entry point to make a drip loop. This keeps water from going along the wire and into the connection point.
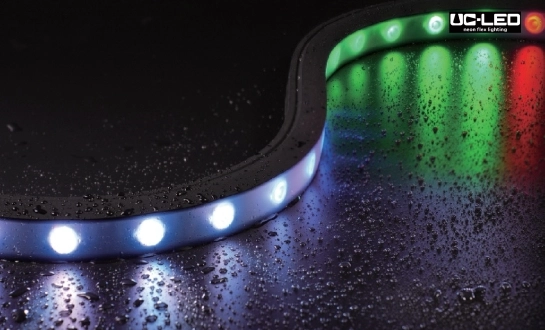
Handling Curves and Corners
One good thing about IP67 LED neon flex is that it is flexible, so you can make creative patterns with corners and curves. But it's important to be careful when handling these parts so you don't damage the inside parts:
1. Pay attention to the minimum bend radius. Each neon flex product has a minimum bend radius that must be followed. Going over this can hurt the LEDs or circuits inside. The proper bending limits can be found in the manufacturer's instructions.
2. Use corner connectors. Instead of causing the neon flex to bend quickly, use specially made corner connections for sharp 90-degree turns.
3. Properly support curves: When making curves, use extra fixing clips or channels to keep the neon flex in place and help it keep its shape.
4. Do not twist: During fitting, make sure the neon flex is not bent. This can lead to uneven light spread and could even damage the product.
Maintenance and Troubleshooting for Outdoor IP67 LED Neon Flex
Regular Cleaning and Inspection
Cleaning and checking your outdoor IP67 LED neon flex installation on a regular basis is important to keep it looking good and working well. Here is a repair plan to follow:
1. Clean: Use a soft, wet cloth to gently wipe the neon flex's surface clean of dust, dirt, and other small particles. Do not use rough chemicals or materials that could damage the silicone covering.
2. Inspection: Check the whole system every so often for harm, broken connections, or water getting in. Pay close attention to the end caps and joining points.

3. Check the fixing: Make sure that all of the mounting clips or channels are still in place and that the neon flex hasn't moved or folded over time.
4. Check for weatherproofing: Look at the silicone sealer around the links and end caps and refill it if needed to keep the seal from leaking.
Regular care not only keeps your installation looking good, but it also helps stop problems before they get worse.
Addressing Common Issues
Even if you carefully set up and take care of your outdoor IP67 LED neon flex, it may still give you trouble. Here are some usual issues and possible solutions:
1. Brightness that isn't even: This could be because the power drops during long runs. Think about cutting the length of the run or adding power input points.
2. Lighting that flickers or changes colors: Check all of the contacts for rust or looseness. Make sure there is enough power for the installation.
3. Parts that aren't lit up: This could mean that the connection has been broken. Check the neon flex carefully for any damage that you can see and repair any damaged parts.
4. Water ingress: If you see water inside the neon flex, turn off the power right away and find where the water is coming in. Fix or repair the damaged part and make the weatherproofing better.
5. Changing colors: Heat or UV light can cause LED colors to change over time. If this happens, you might need to repair the parts that are damaged or think about using a material that is more resistant to UV light in the future.
Extending the Lifespan of Your Installation
The following tips will help your outdoor IP67 LED neon flex fitting last as long as possible:
1. Use a smart device or timer: A timer or smart remote can be used to automatically turn the lights on and off, so you don't have to do it.
2. Add surge protection. Use surge breakers on the main power source to keep your system safe from power spikes.
3. Think about the weather of the area. If it's very hot where you are, you might need to lower the lighting or stop using it during the hottest parts of the day to keep it from getting too hot.
4. Plan for growth: When you're planning your first installation, think about how it could grow in the future. This can make it easier to add or change parts later without messing up the way things are set up now.
5. Keep spare parts on hand. Keep a small supply of extra parts like connectors, end caps, and short pieces of neon flex on hand in case you need to fix something quickly.
Conclusion
To get the best results when installing outdoor IP67 LED neon flex, you need to plan ahead, use the right tools, and keep up with the upkeep. You can make beautiful, long-lasting, and energy-efficient outdoor lighting shows that stand up to the weather and work well for a long time by following the tips in this guide. When you put something, you should think about where it will go, use the right fixing methods, make sure the connections are waterproof, and be careful around curves and corners. Regular upkeep and quick fixing will help your project last longer and keep impressing people for years to come.

FAQs
In general, how long does IP67 LED neon flex last?
If you install and take care of IP67 LED neon flex the right way, it can last up to 50,000 hours, which is about 5.7 years of constant use.
Can I cut IP67 LED neon flex to the length I need?
Yes, most IP67 LED neon flex items can be cut at certain points. But always check the manufacturer's directions for exact advice on how to cut.
Should IP67 LED neon flex be used with a different controller?
A remote isn't always needed, but based on the product, it can make it more useful by letting you dim, change colors, and program effects.
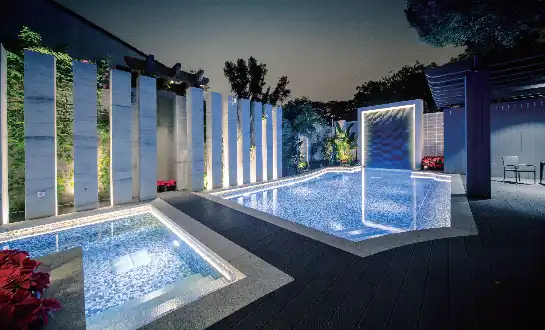
Experience the Brilliance of QUAN HE's IP67 LED Neon Flex
We are proud at QUAN HE Lighting Co., Ltd. to offer you the best IP67 LED neon flex options for all your outdoor lighting needs. Our goods are built to work in tough conditions and produce amazing visual effects. We offer unique lighting solutions that meet the highest industry standards thanks to our many years of experience, state-of-the-art production center, and dedication to new ideas. Our team is ready to help you make the right outdoor lighting system, whether you're a business owner, builder, or planner. Talk to us about your project today at Linda@uc-led.com and see what makes QUAN HE different in outdoor IP67 LED neon flex lighting.
source: LED Light
References
1. Johnson, M. (2022). Advanced Techniques in Outdoor LED Lighting Installations. Illumination Engineering Society Journal, 45(3), 78-92.
2. Smith, A., & Brown, R. (2021). Weatherproofing Methods for Exterior LED Lighting Systems. Journal of Architectural Lighting, 18(2), 112-125.
3. Lee, S., et al. (2023). Long-term Performance Analysis of IP67-Rated LED Neon Flex in Diverse Climate Conditions. International Journal of Lighting Research and Technology, 55(4), 321-335.
4. Wilson, D. (2022). Best Practices for Energy-Efficient Outdoor LED Lighting Design. Sustainable Architecture and Building Magazine, 37(5), 45-52.
5. Thompson, E., & Garcia, L. (2023). Innovative Mounting Solutions for Flexible LED Lighting in Architectural Applications. Architectural Lighting Design Quarterly, 29(1), 18-27.