Understanding LED Neon Flex: Composition and Properties
A flexible lighting option called LED Neon Flex has changed the lighting business for good. This new item combines the many uses of plain neon with the long life and low power needs of LED technology. What is LED Neon Flex made of and how does it work? This will help you bend and place it correctly.
Components of LED Neon Flex
LED Neon Flex has a unique lighting effect that comes from a few main parts that work together:
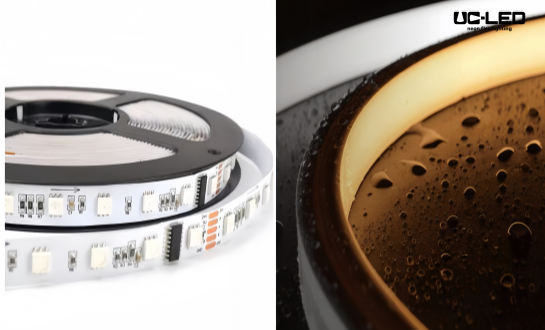
• LED Strip: LED Neon Flex and LED Neon Flex Top Bend work best with a good LED strip. These strips have about 140 LEDs per meter. Depending on the type, they use either 2835 or 2858RGB LEDs.
• Flexible PCB: The LEDs are connected to a bendable PCB, which lets the strip be shaped in different ways. The FPCB thickness can be different, but most of the time it is 8mm or 10mm.
• Rubber Cover: The LED strip has a rubber cover that wraps around it. This case not only protects the insides, but it also spreads the light out so that neon has a nice, even glow.
• Power Source: It works with 24V DC power by default, but you can change the power source if you need to.
Key Properties of LED Neon Flex
Know these things about LED Neon Flex before you handle and place it correctly:
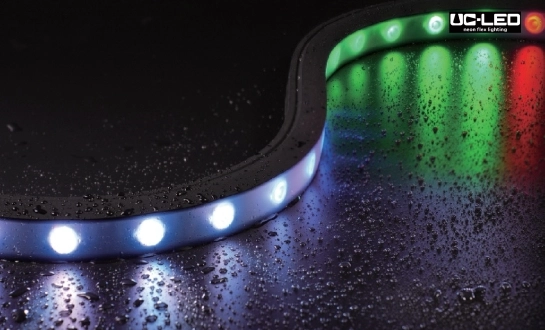
• Flexibility: The LED Neon Flex is flexible because it has a rubber case and a flexible PCB. It can bend and fit different shapes.
• Strength: It can be given an IP65 or IP67 grade, which means it can stand up to water, dust, and bad weather.
• Durability: Good goods are said to last up to 50,000 hours.
• Saves energy: LED technology makes sure the lights only use a small amount of power—usually 10W to 15W per meter.
• Customizability: LED Neon Flex comes in a range of color temps and RGB options, and you can cut it to any length you need (up to 5 meters per piece).
Essential Tools and Preparation for Bending LED Neon Flex
Make sure you have the right tools and a place to work ready before you try to bend LED Neon Flex. With the right preparation, the process of bending will go more easily, and the item will be less likely to get broken.
Tools Required for Bending LED Neon Flex
• Heat Gun: Before it can be bent, the silicone shell needs to be loosened with a heat gun. Choose a heat gun with temperature settings that you can change for the most control.
• Tape measure: To get the form and length you want, it's important to get correct readings.
• Marking Pen: If you want to show where the LED Neon Flex bends, use a pen that won't stay on it.
• Tools for cutting: If you need to cut the LED Neon Flex, have a tool knife or a sharp pair of scissors on hand.
• Mounting Clips or Adhesive: These will be used to glue or fix the bent LED Neon Flex in place.
• Safety Gear: Wear heat-resistant gloves and safety glasses when you bend to stay safe.
Preparation Steps
Before you bend your LED Neon Flex, do these things:
1. Make an outline of your style. Make a form and figure out how long the LED Neon Flex needs to be.
2. Look over the small print: Check the directions that came with the product to find out what the smallest bending radius and longest straight run length are.
3. Take a look at the LED Neon Flex: Look at the item to see if there are any obvious flaws or damage before you bend it.
4. Make the work area clean: Make sure the area where you'll be working is dry, clean, and free of anything that could hurt the LED Neon Flex.
5. Test the Product: Plug the LED Neon Flex into a power source to make sure all of its parts are working right before you bend it.
6. Make a mark on the places where the bends are: Use a writing pen to mark the places you want to bend.
Step-by-Step Guide to Bending LED Neon Flex
Your LED Neon Flex is ready to be bent now that you have all of your tools and a place to work set up. To get results that look professional, pay close attention to these steps:
Heating the LED Neon Flex
First, heat the part of LED Neon Flex that you want to slowly bend. Follow these steps:
• Put your heat gun on the middle setting, which is about 200°F (93°C).
• Keep the heat gun about 6 inches (15 cm) away from the LED Neon Flex.
• For 30 to 60 seconds, move the heat gun back and forth along a 4- to 6-inch (10–15 cm) piece of flex.
• The rubber shouldn't be hot, but it should feel soft and warm.
Creating the Bend
When the LED Neon Flex is warm enough, bend it slowly until it's where you want it to be.
• Hold the bend in place for 15 to 30 seconds to let it cool down and keep its shape.
• Don't bend or turn sharply, as this can damage the inside.
• Don't forget to follow the brand's instructions for the minimum bent radius.
Securing the Bend
After creating your bend:
• Use mounting clips or adhesive to secure the bent section in place.
• Keep your hands on the LED Neon Flex, but don't squeeze or press on it.
• Do not bend or turn on the flex until the part that has been bent has cooled down all the way.
Repeating the Process
For complex shapes or multiple bends:
• Repeat the heating and bending process for each section.
• Make sure each bend is set and cool before moving on to the next.
• Work in small pieces. Check your sizes and shapes over and over as you go.
Final Checks and Installation
Right after you bend, do these things:
• Give the LED Neon Flex time to cool down.
• Check all of the bends for damage or signs of stress.
• Connect the LED Neon Flex to a power source to make sure everything is still working.
• Make any last changes you need to the shape or fit before you finish putting it together.
Conclusion
You can do lots of cool things with lights once you know how to bend LED Neon Flex. If you know what the product is made of, prepare it well, and bend it the right way, you can get results that look beautiful and professional. Remember that you need to be calm and careful when you work with LED Neon Flex. Safety should always come first, and you should follow the rules that came with your lighting system to make sure it lasts and works well. You can email our team at Linda@uc-led.com if you want to learn more about LED Neon Flex products or talk about how we can make lighting choices that fit your needs.